Establishing the Moodle course

Article sections
Management of Moodle courses and participants is done in Peppi. This applies to all implementations found in Peppi. Please make sure that you have defined the teacher information for Peppi’s implementation in Education Planning -> According to Designer’s instructions for implementation.
Information for Moodle course comes from Peppi:
- Course name = module or course name and Peppi code
Course short name = implementation Peppi code
Visibility = Hide (The teacher alters this setting to Show when Moodle course is ready for students.) - Participants: In Moodle course, the teachers and accepted students are added automatically as participants. If student’s enrolment is cancelled, the student will be suspended from this course, and have no access any more. The teacher can delete these students from participants manually.
Setting up a Moodle course in Peppi

Open implementation in Peppi ->
- choose Learning Environments in the left navigation menu
- click the “Add/Connect to Moodle” button.
- Save. A Moodle course will be created in a few seconds. All teachers are added to the Moodle course immediatelly.
If you get an error message, create a Helpdesk ticket (attach the Peppi implementation code to your ticket)
NOTE! A link does not transfer persons.
Copying the contents of the Moodle course is done in Moodle according to instructions.
Connecting the existing Moodle course to the Peppi implementation
If you already have a Moodle course, and you want to use it with another Peppi implementation, you can connect the second course to the Peppi implementation as follows:
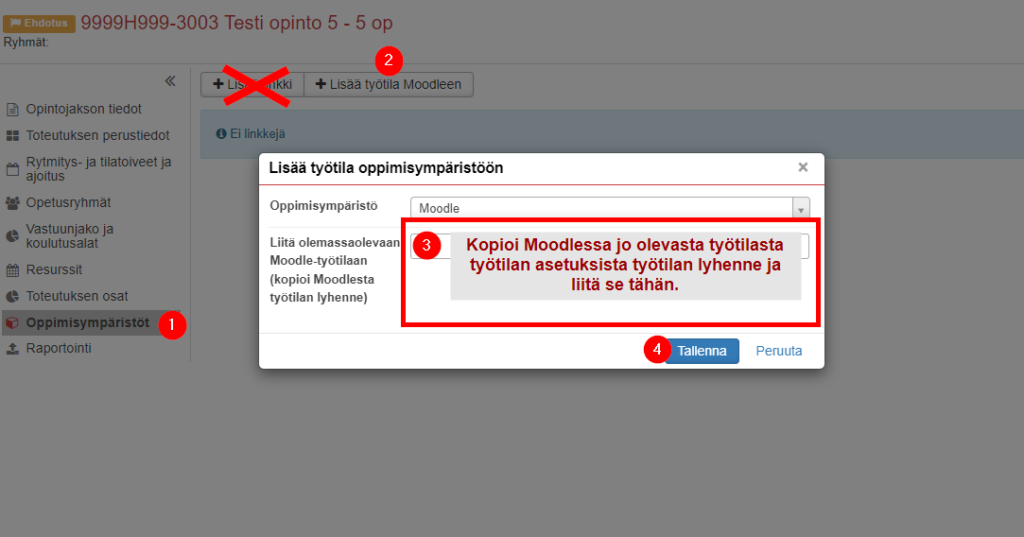
- In Peppi implementation, open Learning Environments
- Click Add/Connect to Moodle
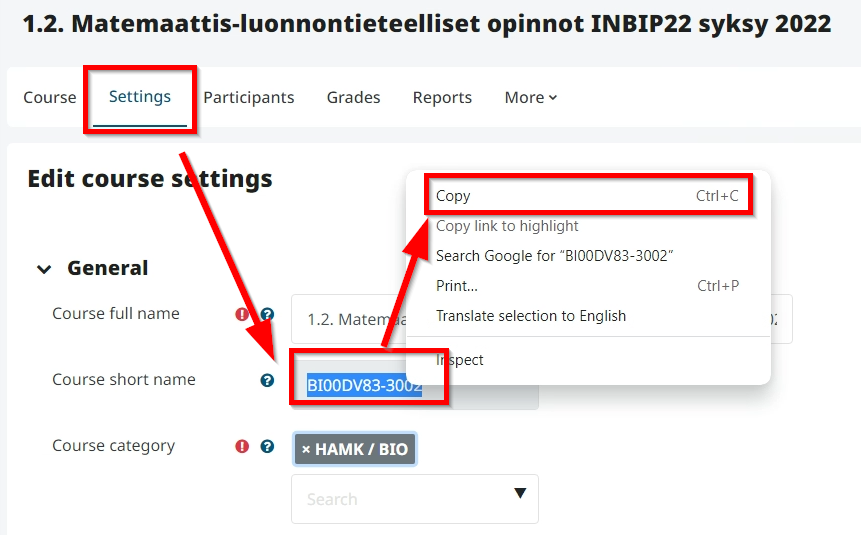
- In Moodle course settings, copy course short name.
- In Peppi implementation Learning Environments, paste the course shortname to Connect to an existing Moodle course.
- Save. The connection is created immediatelly.
In Moodle, all implementations connected to the Moodle course via Peppi are displayed in the Participants/Groups list with the implementation ID of each implementation, the person of each implementation in the group of their own implementation. Do not delete or rename groups of ongoing implementations. If you have created a copy of the old Moodle course for the new implementation, you can remove the names of previous years’ implementation groups from the Participants/Groups list.
Many Peppi implementations in one Moodle course
If you want to connect two or more Peppi implementations with people to the same Moodle course, you must first create a Moodle course for one implementation. Other Peppi implementations are connected to the Moodle course as follows:
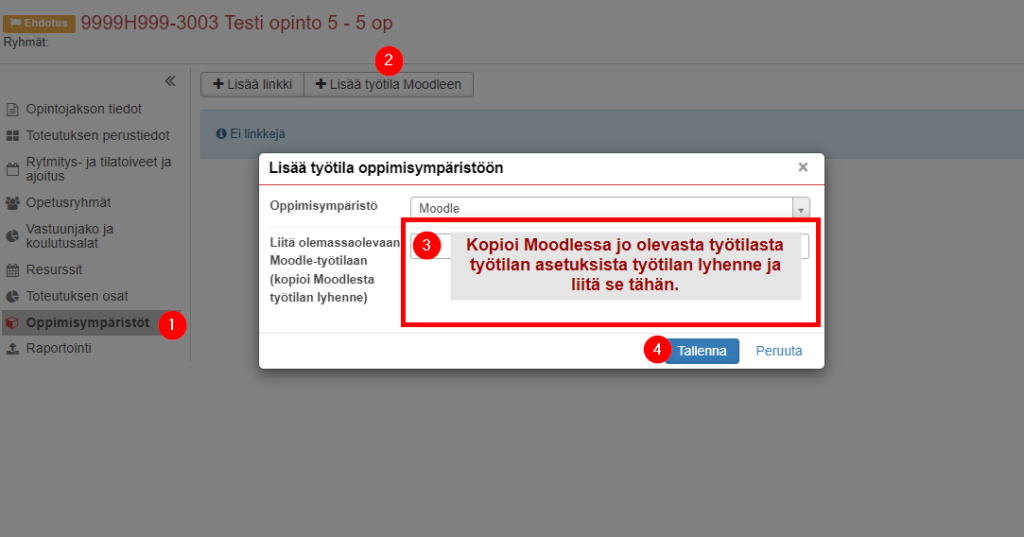
- In Peppi implementation, open Learning Environments
- Click Add/Connect to Moodle
- In Moodle course settings, copy course short name.
- In Peppi implementation Learning Environments, paste the course shortname to Connect to an existing Moodle course.
- Save. The connection is created immediatelly.
In Moodle, all implementations connected to the Moodle course via Peppi are displayed in the Participants/Groups list with the implementation ID of each implementation, the person of each implementation in the group of their own implementation. Do not delete or rename groups of ongoing implementations. If you have created a copy of the old Moodle course for the new implementation, you can remove the names of previous years’ implementation groups from the Participants/Groups list.
Problems with the transfer of accepted students from the data of the Peppi implementation to the Moodle course?
Sometimes there are breaks in the data transfer, and the student data does not transfer from Peppi to the Moodle course, even though the Peppi-Moodle connection has been created according to all the rules of art.
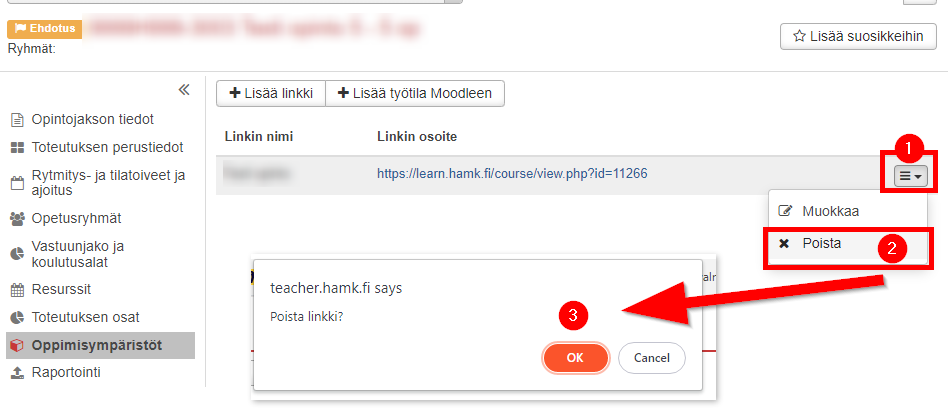
Unlink the Moodle course from the Peppi implementation:
Add the connection again.
NOTE! A link does not transfer people! Always use the Add/connect to Moodle button.
You can use the following characters in the course abbreviation: international alphabet a-z, numbers, space, hyphen and underscore.
Setting up a Moodle course when there is no Peppi implementation yet
If the implementation has not yet been done in Peppi, order the Moodle course in Moodle via the Order a course button in the Info menu in the top bar. When the implementation has been done in Peppi, follow the instructions for Adding an existing Moodle course to the Peppi implementation.
Part of the implementation of continuing education in ASIO
Part of the implementation of continuing education is managed by Peppi, part by ASIO. The Moodle courses are managed in the same system.
Other Moodle courses
If for a special reason you need a Moodle course for an implementation other than Peppi or Asio, order a course in Moodle -> Info -> Request a course STAFF ONLY. You will receive information about the acceptance of the order by e-mail. The subscriber is connected to the Moodle course created as a teacher.
- You may also add participants manually, with course metalink, or by course key. Ohje työtila-avaimen lisäämiseen.
- All manually created Moodle courses are administered in Moodle.
- OBS! Other courses may not be used in credit-giving activities.