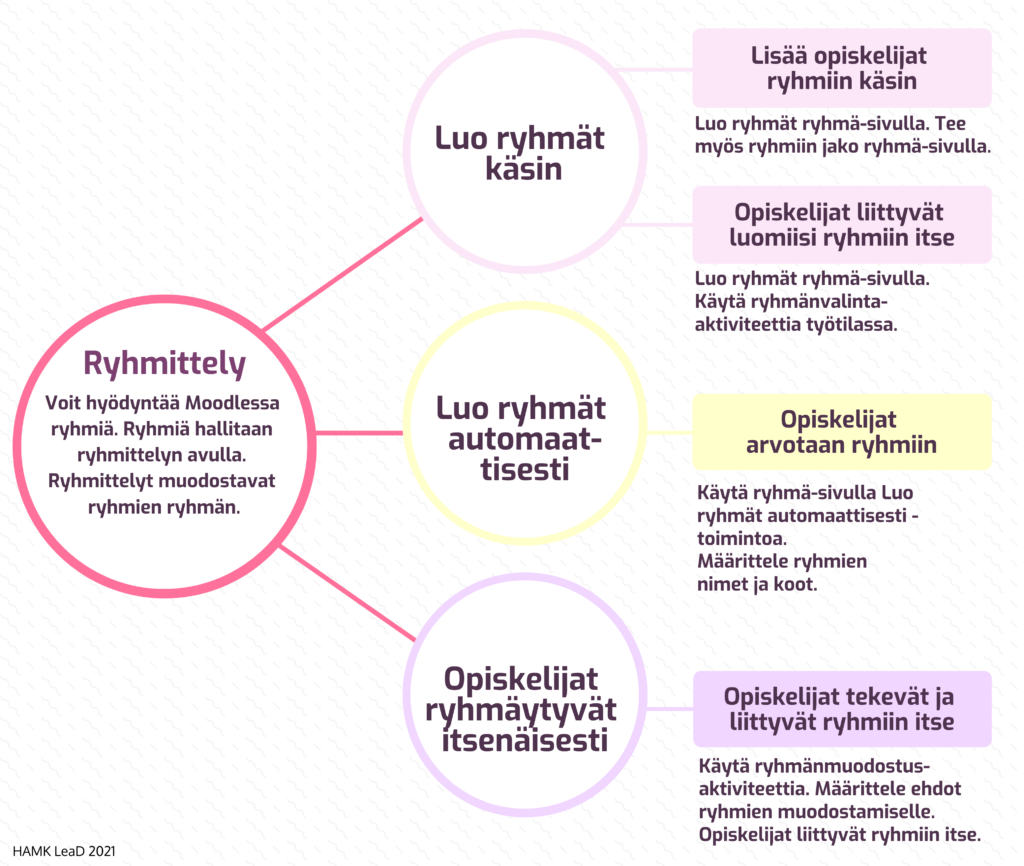
Moodle groups and groupings

Article sections
Take advantage of groups when
- You want students to do group work and manage these easily.
- The group size of the implementation is large and you want to manage and structure the materials and work in the workspace more efficiently.
- You want the language versions of the same implementation in the same workspace – possible by initially making a group selection, where the language used by the student is selected.
- When supervising theses in one workspace, you want to group the students to work with the supervising teachers.
- When students join a Moodle course through Peppi’s implementation, they are automatically assigned to a group with the same name as Peppi’s implementation code.
- One person can belong to many different groups in the same Moodle workspace, e.g. work pairs, project groups, half of a large group A/B.
- In each activity (assignment, discussion area, etc.) you can define whether it is individual or group work and in which groups possible group work is done.
- All these group settings are managed by grouping.
Video instructions for using groups, groupings and related activities
Different tools for creating groups in Moodle
Creating groupings in the workspace
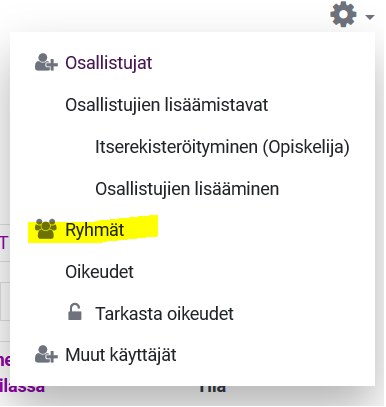
- When you are in Workspace, select Participants from the Navigation section.
- On the Participants page, there is a wheel button, which you can press to open a menu.
- Select Groups.
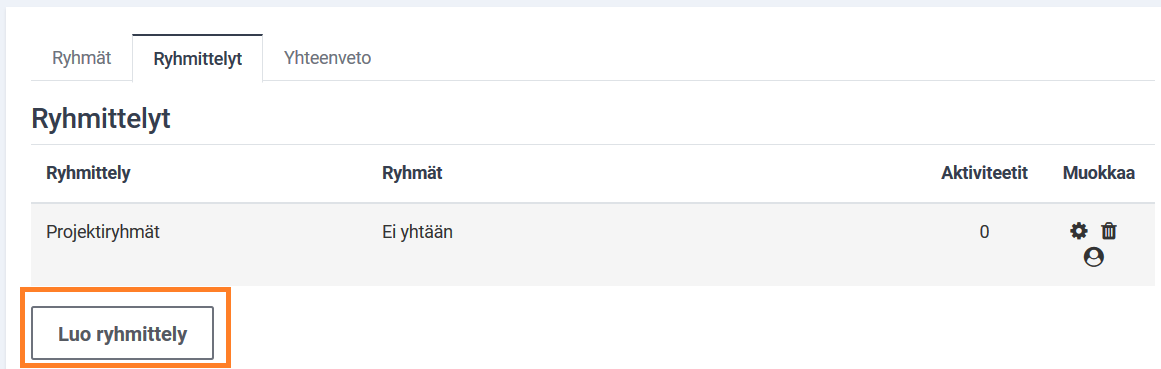
- Open the Groupings tab.
- You can create a grouping with the Create grouping button.
- Give the grouping a name and, if desired, a description.
Adding groups to grouping
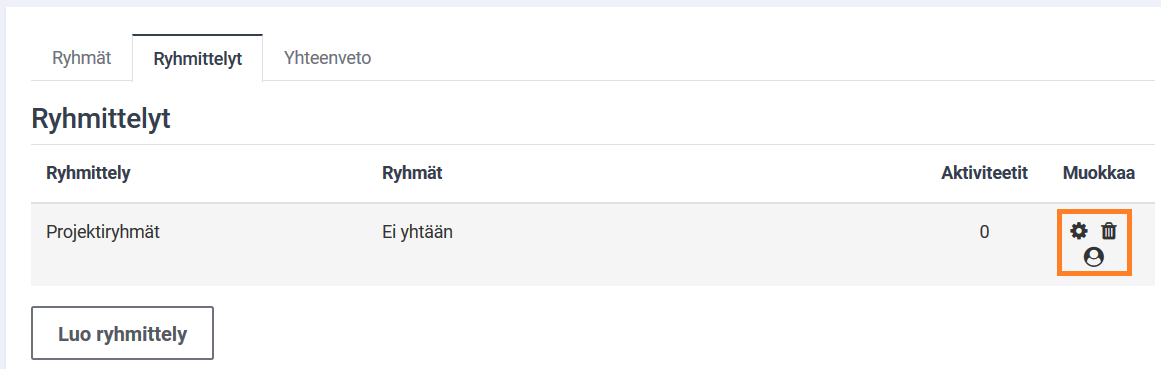
On the Grouping tab, you add the groups you have created to the grouping via the round button.
- Select the appropriate groups from the list, you can select several at once by pressing the ctrl key at the bottom.
- Add groups with the Add button. You can also remove groups from the grouping accordingly.
You can change the name of the group with the gear button. The trash icon removes the grouping.
Creating groups
Create the groups yourself
When you are in Workspace, select Participants from the Navigation section. On the Participants page, there is a wheel button, which you can press to open a menu. Select Groups.
- Create group names one by one, e.g. a1, a2, a3, …. or project group 1, project group 2…
- Add the groups you created to the appropriate grouping.
You can add students to groups manually
When you are in Workspace, select Participants from the Navigation section. On the Participants page, there is a wheel button, which you can press to open a menu. Select Groups.
- From the Groups list, select the group you want to add members to.
- Press the Add/Remove Users button.
- Select the desired person from the Potential members list. If you want to select several people at once, hold down the ctrl button and make the selections you want. Press the Add button again.
- You can also use these two lists to remove members from the group.
- Press the Back to groups button. Make additions to all necessary groups in this way.
Add Group selection to the workspace as an activity 
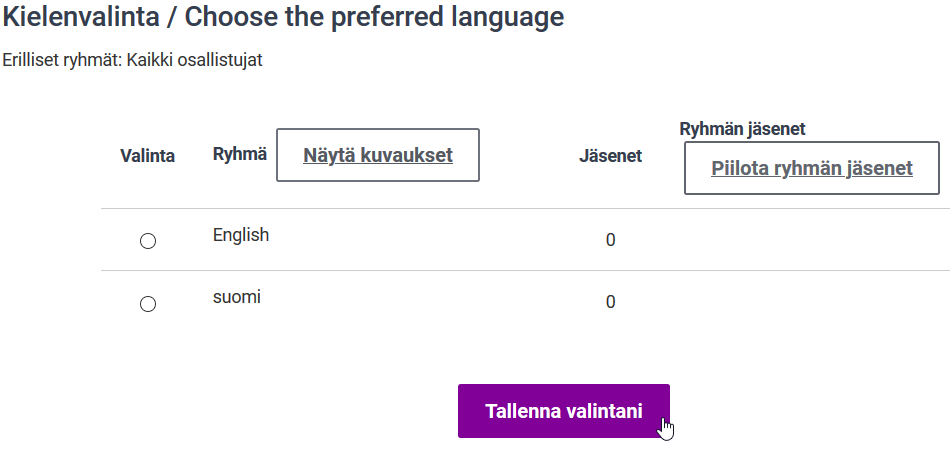
The group selection activity can be used at the beginning of the implementation, for example, to make a language selection. In this way, you let the students choose which group you define in advance to associate themselves with.
Before adding the activity, do the necessary grouping and groups for it.
- Turn on workspace editing mode.
- Add Group Selection activity.
- Give the group selection activity a name that will be visible to the students.
- Define the selection settings, see below for more details.
- Save the activity settings.
- Can students see each other’s names? Are the results always shown to the students, or for example only after the selection period has ended?
- Is there a limit to the number of group members? Limit group size –>Use in all groups.
- If enabled, you can define group-specific limits in addition to this default amount by selecting a single group from the list in the field that opens.
- Which group can a student choose to belong to? By choosing the grouping you need, you can easily get the bundle of groups you need.
Select, Add.
Use the Automatically create groups feature
When you are in Workspace, select Participants from the Navigation section. On the Participants page, there is a wheel button, which you can press to open a menu. Select Groups. Press the Automatically create groups button.
- Specify a naming convention (e.g. work pair) and then add either # for group numbering or @ after for alphabetization.
- You can choose whether you want the groups to be formed based on the number of groups, or whether the groups are divided according to how many members you want in them.
- Select the members only from the students role, if you do not want e.g. teachers to be included in the selection.
- You can choose whether you want the groups to be formed under the grouping you have already made. You can also create your own grouping for the resulting set of new groups. In this case, name it under Create for grouping in the Grouping section.
 Group formation activity: Based on the conditions, students form groups themselves and join them
Through the activity, students form and name their own groups. The teacher defines the conditions under which groups students are allowed to form (e.g. group size), and the students make their own choices. Note before doing this, check the workspace grouping settings.
The activity is especially effective if there are a lot of students in the workspace, who otherwise as a teacher you would have to divide into groups by hand.
- Turn on workspace editing mode.
- Add a Group Formation activity.
- Give the group selection activity a name that will be visible to the students.
- Define the selection settings, see below for more details.
- Save the activity settings.
- You can define the time when group formation is open.
- Select the grouping under which the groups are formed.
- Specify the minimum and maximum size of the group if desired.
- Check user rights. It can be handy if the student can leave the group by himself, i.e. change the group on the fly without the teacher.

Summary page
On the summary tab of the Groups section, you can see all workspace groupings, groups and their members at once. You can also see students who are not in groups.
Ryhmätöiden ja -aineistojen asetukset
Instructions for the activities: Moodle: Group work
Instructions for the materials: Moodle: guides the student’s activities with conditions and restrictions