
Instructions for Using the Hybrid Kits (Hybrid Camera Kit & Hybrid Mic Kit)
Article sections
With the hybrid kits, you can transmit video and audio in remote meetings and hybrid events even when the room does not have a camera or microphone installed.
Hybrid kits (Hybrid Camera Kit and Hybrid Mic Kit) can be reserved through the Trail service Trail AV-equipment booking service. Reserve the equipment well in advance, and remember to cancel your reservation if you no longer need the devices. When returning the equipment, make sure that all parts are included and packed neatly. Meeting devices and other AV equipment at the University Centre are borrowed and returned as self-service in room C-321 (Videohub), located on the 3rd floor of Building C.
Contents of the Kits and how to Use the Components

- Yealink USB camera (tripod and accessory bag) – Hybrid Camera Kit (Trail)
- Sennheiser – Conference Microphones in the Case – Hybrid Mic Kit (Trail)
Sennheiser – Conference Microphones in the Case (Hybrid Mic Kit)
The Sennheiser conference microphones transmit audio two-way in a large room. People sitting in different parts of the room can hear remote participants in the meeting and make their own voices heard by remote participants. Each microphone unit has a speaker and a microphone. The recommended maximum distance from the speaker to a microphone unit is 2 metres, and one unit can pick up high-quality audio from approximately 6 participants. When all units are in use, audio can be picked up from approximately 24 participants at one time.
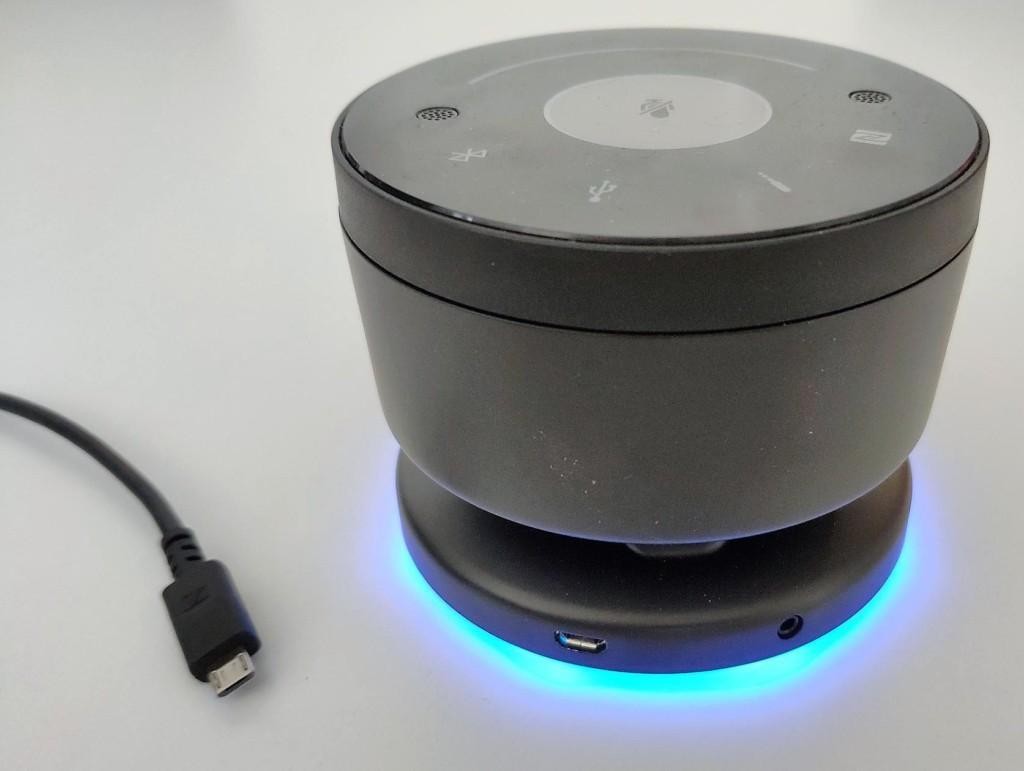
- One of the conference microphone units functions as the control unit and is connected to the computer participating in the meeting.
- You can identify the control unit by the fact that it is the only unit with a USB cable port (shown in the image).
- The remaining three units connect wirelessly to the control unit and can be placed in different parts of the room. The units are battery-powered, and when fully charged, they provide enough power for 7–8 hours of continuous use.
Setting up the conference microphones
- Connect the control unit to your computer with a USB cable.
- Place the other 3 units around the room.
- Check on your computer that the device has been selected as the computer’s default audio device (see image below).
Selecting the conference microphones as a sound device in computer
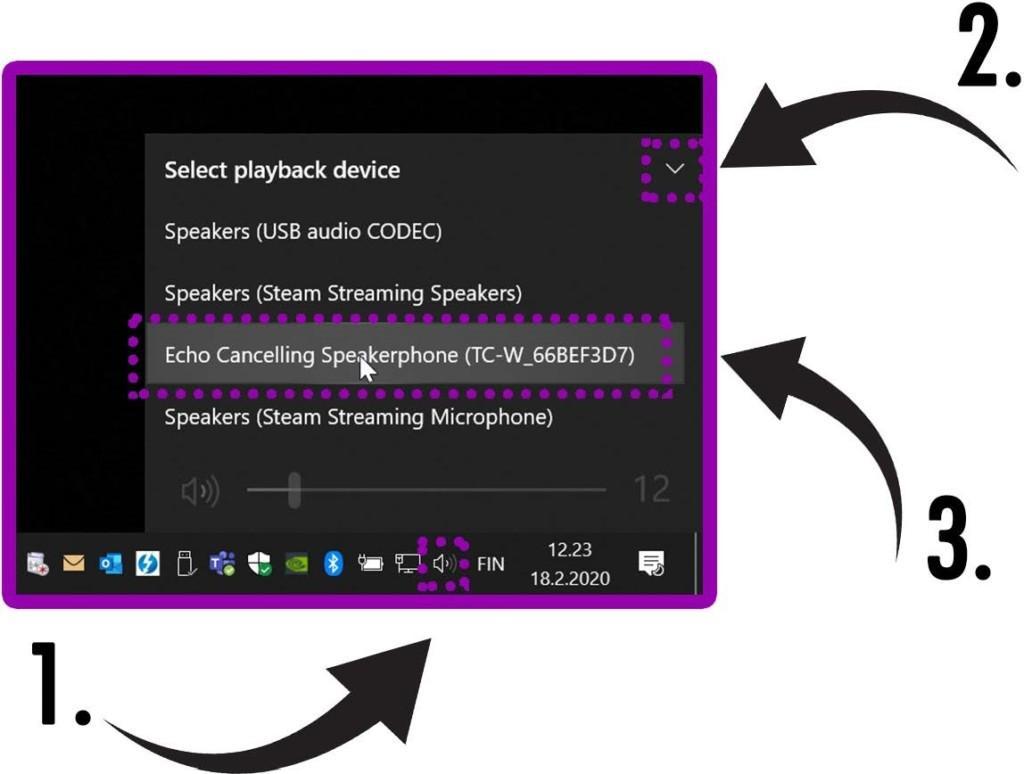
- Left-click the audio icon in the notification area.
- Click the small arrow to open the list of audio devices.
- Select “Echo Cancelling Speakerphone” from the list as the audio device.
Watch the instruction video on using the Sennheiser conference microphones:Team Connect Wireless (Kaltura, login required).
Yealink – Conference Camera (Hybrid Camera Kit)
The Yealink conference camera is suitable for transmitting high-quality video in remote meetings. The camera can be operated using an easy-to-use remote control or by utilizing AI features that allow the camera to follow the speaker or adjust the framing as presenters move. The camera is connected to the computer with a USB cable, allowing the camera to be placed 6–7 metres away from the computer.
- Place the camera at a suitable distance and height.
- Connect the power cable and USB cable to the connectors on the back of the camera (see image).
- Connect the other end of the USB cable to your laptop. The camera will then appear as ready to use in various meeting applications (Teams, Zoom, etc.).
- You can control the camera using the buttons on the remote control (see lower image). The camera has five tracking functions:
- (Multifocus) Frames up to six people in close-up at the same time
- (PTZ) Pan, tilt, and zoom, allowing you to define the desired image framing yourself
- (Autoframing) Attempts to frame all people in front of the camera
- (Speaker tracking) Frames the person who is speaking
- (Presenter Tracking) Follows the person who has first been identified to the camera by raising their hand next to their face
- Watch the instruction video on using the Yealink conference camera Yealink-Hybrid Camera kit käyttö ja toiminnot. (Kaltura, login required).

Camera Tripod

You can keep the camera attached to the tripod at all times. If, for some reason, the tripod has been detached, follow these instructions:
- The base of the camera already has the mounting plate required for attaching it to the tripod. Press the plate into place so that the long side opposite the locking lever goes in first.
- Lower the lever side into place as well. The tripod lock will now click into place.
- Tighten the locking lever by hand by turning it to the lock position.
- The height of the tripod legs and the centre column can be adjusted if necessary.
- Open the locking levers on the legs to adjust the length of the legs.
- When adjusting the height of the centre column, open the locking lever, after which you can adjust the height by turning the crank.


Packing the Hybrid Kits
Packing the Microphones (Hybrid Mic Kit)
- Disconnect the control unit from your computer.
- Place the units back in the case in the same orientation as when they were on the table, with the battery section facing down so that the unit can charge. A green light will be visible on the units when you close the lid.
Packing the Camera (Hybrid Camera Kit)
- Disconnect the cables from the camera.
- Gather the cables into a bundle and pack them in the accessory bag.
- Remember to also pack the remote control and USB hub if you have used them.
- The tripod can be left attached to the camera.
