Steps of the module introduction video project
Article sections
The module introductory video summarizes the competence and working methods created by the module for students. The video does not present details related to the implementation, such as dates, as these are opened to the student in the implementation plan. This way the video can also be utilized in the later modules.
However, the video shows concretely what is being done during implementation, how we are working during implementation, and what kind of things – phenomena – are being worked on. The video answers the question of what benefits a student can get from participating in an implementation. The video can be used to present the co-operation patterns of the module with working life or, for example, to present extensive assembling projects in more detail.
 The video project starts at the kick-off meeting
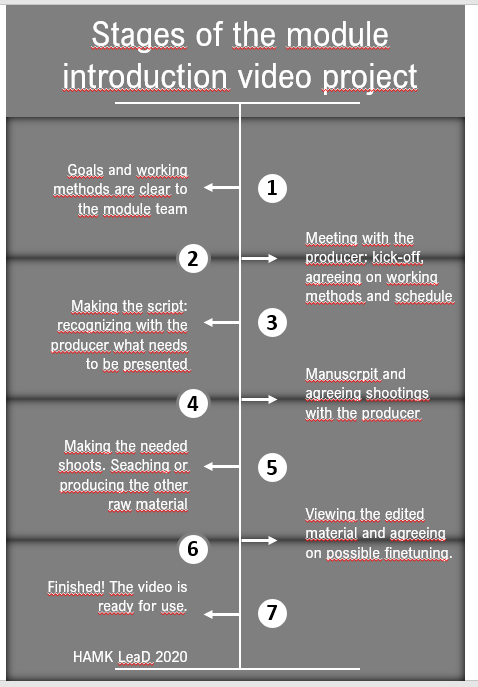
When starting the project, the objectives and working methods of the module must be clear to the module team itself. Based on these, one can set out to plan with the producer: what need to be shown on the video for the student to get the best possible understanding? Read more about the high-quality module planning process: High-quality module implementation.
The teacher or module team is not left alone in the video project; the video project is led by the producer who is responsible for making the plan and implementation of the video progress, on schedule. The teacher does not have to think about the technical solutions or implementation himself, but here too the help is obtained from the producer, who determines the solution to be taken into production based on the module team’s wishes and ideas.
The project is launched at a kick-off meeting, where the project’s objectives and stages will be reviewed, and a timetable framework will be agreed. This makes it easier to agree on schedules with, for example, potential partners, well in advance.
Planning is the key to a successful video
Once the right things have been agreed upon, you can start writing the blueprint. The blueprint does not mean a precise word-by-word document, it means the structure of the video made into actionable scenes. At the same time, you choose what kind of elements are needed for the video so that the scenes can be made. If necessary, the module team will continue to work on the plan independently.
After the script, it is the detailed storyboard’s turn. The storyboard expresses exactly what is being said in each scene, appears as text, or otherwise on the viewer’s screen. At the same time, it becomes clear what other complementary raw material may be needed.
Once all the necessary elements of the video are known, a timetable can be agreed for the filming of the necessary video material as well as for ensuring other supplementary material. The storyboard does not necessarily have to be slavishly followed in filming if you notice that something is not working, but a detailed plan gives you the certainty to act and appear in front of the camera during filming.
Production and post-production
At the filming site, you work with the producer and the filming team. The producer shall ensure that camera angles and the subjects being shot are as agreed, and he also ensures that everything in the filming advance smoothly.
Once the descriptions are finalized, the production team compiles the video and makes the necessary cuts. Finally, the module team looks at the draft of the finished module video. Together with the producer, the team ensures the result is as agreed and, if necessary, the final adjustments are made to the video. Once the video is complete, it is freely distributable.
You can check out how to make a first module demonstration video in this blog post.